Protecting Your Django Forms: Implementing Google reCAPTCHA V3 for Enhanced Security
Introduction
In the ever-evolving digital landscape, safeguarding your Django forms against spam and bot invasions has become paramount. Enter Google reCAPTCHA V3, a robust invisible solution offering a myriad of advantages.
Benefits of Using reCAPTCHA on Your Forms
Implementing reCAPTCHA goes beyond mere security; it's about fortifying your forms against unwanted intrusions. The advantages include:
- Enhanced Security: Say goodbye to spam and malicious bot submissions.
- Improved User Experience: Shield your users from intrusive challenges, ensuring a smooth and swift form completion process.
- Increased Conversion Rates: A faster and simpler form experience translates to higher conversion rates.
Why Choose Google reCAPTCHA V3 Over V2 and Others?
The invisible nature of Google reCAPTCHA V3 sets it apart, providing distinct advantages:
- Less Intrusive: No checkboxes or pictograms; users won't even know it's there.
- Faster and Simpler Completion: A seamless user journey with no interactive challenges speeds up form completion and reduces lost conversions.
- Enhanced Accuracy: V3 employs a more advanced algorithm, offering better accuracy in identifying spam and bots.
- Granularity: Using actions, you can identify which user interaction was happening at the time the reCAPTCHA score was requested.
- Flexibility: Rather than returning a simple accept/reject, reCAPTCHA V3 returns a risk score allowing you to set higher or lower levels of acceptance for each use case.
Personally, I found that the switch from the reCAPTCHA V2 Checkbox to the V3 version worked really well. Every day, my website experienced over 50 bogus signups and up to 40 spam messages sent through the contact form. With a false positive rate of about 40%, the reCAPTCHA was only 60% accurate in detecting bot activity. Hundreds of attempts were made to get in to the unprotected login form in the meanwhile.
Since adopting reCAPTCHA V3, not a single spam message has made it through, the influx of bogus signups has dropped to zero and the login form, once under constant attack, now rejects all form based unauthorized login attempts before they hit the authentication service.
Now, let's navigate through two powerful methods to seamlessly integrate Google reCAPTCHA V3 with Django forms.
- The first method involves direct deployment using Google's recommended JavaScript to obtain a token and Django's form
clean()method to verify and score the risk. - The second method makes use of the efficiency of the django-recaptcha package, easing the integration process.
We'll also touch upon the rising hCaptcha alternative, endorsed by major players like Cloudflare.
And for Wagtail users, we go through the wagtailcaptcha package, ensuring seamless integration with Wagtail's form builder.
Prepare to fortify your forms effortlessly!
In the code below, I'm using www.recaptcha.net for API calls. For reCAPTCHA, it's interchangeable with www.google.com, but with google.com banned in several regions worldwide, using recaptcha.net has a broader reach.
Creating a Google reCAPTCHA V3 Site in the Console
You should be familiar with Google's reCAPTCHA console and have a V3 key set up before beginning. If you don't have a key, the process is pretty straightforward:
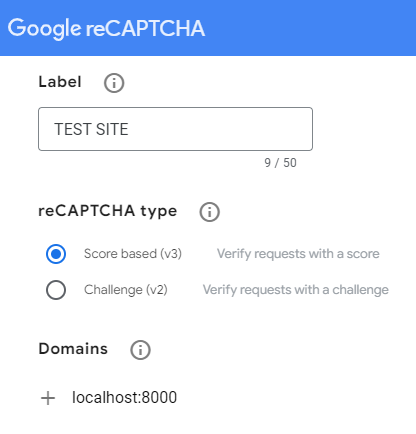
- Visit the reCAPTCHA Website: Go to the reCAPTCHA website and click on the "Admin Console" button to access the reCAPTCHA admin page.
- Create a New Site: Create a new site by clicking on the "+" icon next to the "Google reCAPTCHA" logo. Follow the on-screen instructions to set up your site.
- Choose reCAPTCHA V3: During the setup process, make sure to select "reCAPTCHA V3" type.
- Add Domains: Specify the domains where you'll be implementing reCAPTCHA. This helps Google ensure the security of your forms on specific websites. I recommend creating separate keys for your development and production environments to keep the production data pure and to better see results from testing during set up.
- Get API Keys: After successfully creating a site, you'll be provided with two keys – a "Site Key" and a "Secret Key." The Site Key is used on the client side (your website), referred to in the code below as the public key. The Secret Key is used on the server side (your backend), referred to in the code below as the private key.
Remember to keep your Secret Key confidential and never expose it either in your client-side code or in any public GitHub repository.
Implementing reCAPTCHA V3 Directly
For this example, we will inherit an already existing login form from the django-allauth package and add reCAPTCHA V3 functionality. Adjust for your own use case. In most cases, you'll just need to add the field directly to your form class and amend the clean() method as required.
The reCAPTCHA V3 Process
The basic process involves:
- Add a hidden reCAPTCHA field to the form.
- Request a reCAPTCHA token on the front end using the Site (public) key and set that token as the value of the hidden field.
- In the the back end, on form submit, send the token to Google's reCAPTCHA server to obtain a score.
- Use that score to determine whether the form should be processed or rejected. Scores are between 0 (highest risk) and 1 (lowest risk). Bot activity will most likely be scored 0.1, while a valid interaction will usually score 0.9.
Add reCAPTCHA to Site Settings
For this exercise, I'll add the key strings to the site settings in my local.py (added to my .gitignore to allow separate keys in my dev and prod environments). I'll also add a default required score:
RECAPTCHA_PUBLIC_KEY = 'your-site-key'
RECAPTCHA_PRIVATE_KEY = 'your-secret-key'
RECAPTCHA_REQUIRED_SCORE = 0.8
Add a hidden reCAPTCHA field to the form
We need to add a field to the form to receive the initial reCAPTCHA token. This field should be hidden as it bears no part in the user interaction.
As mentioned earlier, I'm inheriting a pre-existing form model so only need to tack the extra field on at this stage. Alternatively, add the field directly to your form model if this serves your use case better.
I'm using a blank label and the HiddenInput widget to prevent any visible elements being rendered.
from allauth.account.forms import LoginForm as BaseLoginForm
from django import forms

class LoginForm(BaseLoginForm):
    recaptcha = forms.CharField(label="", widget=forms.HiddenInput())
Add reCAPTCHA to the Form Template
Form Fields
Depending on how you're rendering your fields you may need to add the recaptcha field input element with:
{{ form.recaptcha }}Otherwise, if looping through fields, your code should handle not rendering any visible content for a hidden field with no label.
Make sure your form has a unique ID as we will need this for the JavaScript. Add a container at the top of the form to display any non-field errors, include a unique ID on that container to allow any token errors to be displayed:
<form method="POST"
      action="{% url 'account_login' %}"
      id="loginForm"
      novalidate>
    {% csrf_token %}
    {% if form.non_field_errors %}
        <div class="alert alert-danger" id="non_field_errors">
            {{ form.non_field_errors }}
        </div>
    {% endif %}

    << -- other form fields -->>

    <div class="d-none">
        {{ form.recaptcha }}
    </div>
    <button type="submit" class="btn btn-primary">Submit</button>
</form>
Fetch the Token with JavaScript
So far, we've rendered the hidden input element to receive the reCAPTCHA token value.
The next step is to load the reCAPTCHA api JavaScript and add a listener to the form submit event to fetch the token before submitting the form.
You will need your site/public key for this step. You can either load this via a context variable, or retrieve it via a template tag.
There are various solutions around for this, among them, custom context processors which will load every site setting for ever template render request.
This is a lot of unnecessary overhead. My preferred solution is a simple template tag that can be called on demand to retrieve a specific setting.
from django import template
from django.conf import settings
register = template.Library()

@register.simple_tag()
def get_setting(key):
    return getattr(settings, key, '')
Now, in the template, I can retrieve the reCAPTCHA public key with
{% get_setting 'RECAPTCHA_PUBLIC_KEY' as recaptcha_key %}More information on Django template tags can be found on the Django website.
Inserting the token before during form submit:
- We listen for the
submitevent on the form itself. - When the form is submitted, we asynchronously obtain the reCAPTCHA token using
grecaptcha.execute(). - If successful, we set the token value in the hidden input field (
id_recaptcha) and then submit the form. - Any errors during token retrieval are caught and can be handled appropriately (i.e., displaying an error message).
This approach ensures that the reCAPTCHA token is acquired before form submission, reducing the risk of abuse.
<script src='https://www.recaptcha.net/recaptcha/api.js?render={{ recaptcha_public_key }}'></script>
<script>
document.addEventListener('DOMContentLoaded', () => {
    document.getElementById('loginForm').addEventListener('submit', async (e) => {
        // Prevent the default form submission behaviour
        e.preventDefault();
        try {
            const token = await grecaptcha.execute('{{ recaptcha_public_key }}', { action: 'login' });
            document.getElementById('id_recaptcha').value = token;
            // Submit the form with the reCAPTCHA token
            document.getElementById('loginForm').submit();
        } catch (error) {
            // Handle any errors
            console.error('Error obtaining reCAPTCHA token:', error);
            document.getElementById('non_field_errors').textContent = 'reCAPTCHA validation failed. Please try again.';
        }
    });
});
</script>- The token input element has the id
id_recaptchabecause we named the field recaptcha in the previous step. Django adds theid_suffix by default. Make sure this is relevant to your case. - Make sure the form and error container ID's have been changed to suit your form.
- The token is requested with
action: "login". The action value is entirely arbitrary and is only used on the console to identify the source of reCAPTCHA requests. You might also have"signup","contact"etc..
The base for this script can be found on the reCAPTCHA developer's notes.
reCAPTCHA V3 tokens expire after two minutes. If you're protecting an action with reCAPTCHA V3, make sure to call execute when the user takes the action rather than on page load. An expired token will result in a failed reCAPTCHA validation request.
Verifying the reCAPTCHA on the Back End
To vastly simplify this process, we'll use the requests package for sending the reCAPTCHA response request and interpreting the result.
The first step is to create a function that takes a token, requests a score from Google and determines if the result is a pass or fail:
import requests
from django.conf import settings

def recaptcha_is_valid(token):
    response = requests.post(
        'https://www.recaptcha.net/recaptcha/api/siteverify',
        data={
            'secret': settings.RECAPTCHA_PRIVATE_KEY,
            'response': token
        }
    )
    result = response.json()
return (result['success'] and result['score'] >= settings.RECAPTCHA_REQUIRED_SCORE)- The token and secret (private) key are sent to Google reCAPTCHA servers for verification.
- The response content is converted to a Python dictionary
- The request is considered successful (
True) if the responsesuccesskey has aTruevalue (the token was valid) and that the score was at least the value we assigned our required score to in the settings. If either of these conditions are not met, the function returnsFalse.
The result is a JSON object in the following format:
{
  "success": true|false,      // whether this request was a valid reCAPTCHA token for your site
  "score": number             // the score for this request (0.0 - 1.0)
  "action": string            // the action name for this request (important to verify)
  "challenge_ts": timestamp,  // timestamp of the challenge load (ISO format yyyy-MM-dd'T'HH:mm:ssZZ)
  "hostname": string,         // the hostname of the site where the reCAPTCHA was solved
  "error-codes": [...]        // optional
}
Returning to our Form class, we can use this test in the form clean() method to determine whether or not to process the form.
class LoginForm(BaseLoginForm):
    recaptcha = forms.CharField(label="", widget=forms.HiddenInput())

    def clean(self):
        if recaptcha_is_valid(self.data.get('recaptcha')):
            cleaned_data = super().clean()
            return cleaned_data
        else:
            self.add_error('', _("Invalid recaptcha. Please try again."))
It's important to verify the reCAPTCHA before calling the super().clean() method and to only call that if the reCAPTCHA is verified.
Calling super().clean() will trigger the form validation. Doing this first will submit the username and password to the authentication backend (the very thing we want to avoid for bogus attempts) and bounce the form back on failure without ever calling the reCAPTCHA verification.
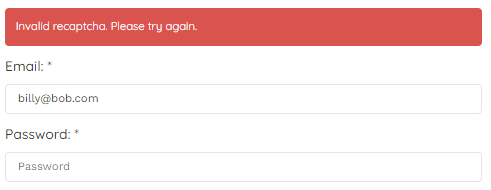
Note that by using an empty string for the first parameter of the add_error() method, it's adding the error as a non-field error to the form. Back on the template, we had made sure there was a space for non-field errors to be displayed as a banner at the top of the form.
If your template logic requires you to attach errors to a particular field, use
- self.add_error('recaptcha', _("Invalid recaptcha. Please try again."))
and ensure your template has the logic to display field errors for hidden fields.
Summary
That's all you need to get Google's reCAPTCHA running on your Django forms. For a long description, the code involved is fairly minimal and easily maintained. It could also be easily modularised for greater portability.
To simulate a failed reCAPTCHA validation, set your RECAPTCHA_REQUIRED_SCORE to any value greater than 1.
Using hCAPTCHA
Why switch?
There are a number of reasons for considering an alternative CAPTCHA service to Google:
- Google's services are blocked in certain regions accounting for over 25% of all Internet users globally.
- You may be concerned over potential data harvesting by Google.
- Google's reCAPTCHA is free for the first 1 million queries each month (or 1000 per second). This is ample for most mortals, but introduces significant costs for larger players.
Cloudflare recently switched to hCAPTCHA citing all three of these reasons.
Implementing hCAPTCHA in Django Forms
Rather than rehash the steps described in the previous, the process is remarkably similar, however to gain access to the passive/invisible CAPTCHA requires that you have at least Pro status (US$99 / month). Using the challenge response will need a little modification of the is_valid_recaptcha() method described above, depending on which type of hCAPTCHA you decide to use.
If you decide to go this route, I recommend reading through their document describing how to Switch from reCAPTCHA to hCaptcha.
One big difference is that reCAPTCHA scores run from 0.0 (bot) to 1.0 (person). hCaptcha scores are risk scores, and thus they run from 0.0 (no risk) to 1.0 (confirmed threat).
result['score'] >= settings.RECAPTCHA_REQUIRED_SCOREbecomes
result['score'] <= settings.HCAPTCHA_REQUIRED_SCOREImplementing reCAPTCHA V3 with django-recaptcha
The django-recaptcha package simplifies a lot of the coding for you and is an excellent choice is most use cases.
Before getting started with this, it's worth noting that the package was recently updated to version 4 (November 2023) which fixed a long standing issue where the reCAPTCHA V3 token was requested on page load rather than form submission. The resulted in an invalid reCAPTCHA if the form was open for more than 2 minutes.
If you previously used version 3 of this package, the namespace changed from captcha to django-recaptcha with version 4, you'll need to update your import paths accordingly.
Install the package
Install with pip install django-recaptcha and add to your INSTALLED_APPS setting:
INSTALLED_APPS = [
    ...,
    'django_recaptcha',
    ...
]
And in your local settings, add the same keys as before, and also the optional reCAPTCHA domain if desired:
RECAPTCHA_PUBLIC_KEY = 'your-site-key'
RECAPTCHA_PRIVATE_KEY = 'your-secret-key'
RECAPTCHA_REQUIRED_SCORE = 0.8
RECAPTCHA_DOMAIN = 'www.recaptcha.net'
Amend the Form Class
There is no need for the custom form clean() method this time as the validation is handled by the django-recaptcha field instead.
Import the ReCaptchaField and ReCaptchaV3 widget and use these to declare the recaptcha field in the model:
from django_recaptcha.fields import ReCaptchaField
from django_recaptcha.widgets import ReCaptchaV3

class LoginForm(BaseLoginForm):
recaptcha = ReCaptchaField(widget=ReCaptchaV3(action='login'))The required score can also be set when declaring the widget in the form class:
recaptcha = ReCaptchaField(
    widget=ReCaptchaV3(
        action='login',
        attrs={
            'required_score':0.85
        }
    )
)
Amend the Form Template
The form no longer requires any additional JavaScript. We still need to render the hidden field as before, but because the django-recaptcha package returns the error as a field error, we need an additional bit of code at the top of the form to display any reCAPTCHA errors:
<form method="POST"
        action="{% url 'account_login' %}"
        id="loginForm"
        novalidate>
    {% csrf_token %}
    {% if form.non_field_errors %}
        <div class="alert alert-danger">
            {{ form.non_field_errors }}
        </div>
    {% endif %}
    {% if form.recaptcha.errors %}
        <div class="alert alert-danger">
            {{ form.recaptcha.errors }}
        </div>
    {% endif %}

    << -- other form fields -->>

    <div class="d-none">
        {{ form.recaptcha }}
    </div>
    <button type="submit" class="btn btn-primary">Submit</button>
</form>
Summary
Testing this in debug mode with minimum score of 10, you can see the failure message in the terminal window:
- ReCAPTCHA validation failed due to its score of 0.9 being lower than the required amount.
The few adjustments needed above demonstrate how much simpler and easier to maintain this approach is. For the majority of use cases when no process modification is needed, the django-recaptcha package provides a much easier way to use reCAPTCHA for form protection.
Adding reCAPTCHA V3 to Wagtail's Form Builder Pages
For this section, it's assumed you are familiar with using Wagtail's form builder and have a working form page already.
If not, I'd recommend going through the Wagtail documentation and building your form page first.
Introduction
Wagtail ReCaptcha is a package that acts as an extra layer over the top of the django-recaptcha package to simplify the process for adding reCAPTCHAs to forms built with Wagtail's form builder.
By default, the package will add a V2 checkbox to the end of the form, but, with a little tweaking, can be used to provide verification using any of Google's reCAPTCHA widgets.
Take care to match the correct version of wagtailcaptcha with django-recaptcha. wagtailcaptcha 1.x is incompatible with django-recaptcha 4+.
Make sure to update wagtailcaptcha before using the following code.
Install wagtailcaptcha
- Install
wagtailcaptchavia
- pip install wagtail-django-recaptcha
- Ensure you have at least version 4 of django-recaptcha with
- pip install --upgrade django-recaptcha
* See the note above regarding version compatibility.
- Add
wagtailcaptchaanddjango-recaptchato yourINSTALLED_APPSsetting. - Configure
django-recaptchaas explained in the previous section and in the GitHub docs.
Update the Form Inheritance
Our starting point will be the FormPage example from the Wagtail docs:
from wagtail.contrib.forms.models import AbstractEmailForm

class FormPage(AbstractEmailForm):
    intro = RichTextField(blank=True)
    thank_you_text = RichTextField(blank=True)

    content_panels = AbstractEmailForm.content_panels + [
        FieldPanel('intro'),
        InlinePanel('form_fields', label="Form fields"),
        FieldPanel('thank_you_text'),
        MultiFieldPanel([
            FieldRowPanel([
                FieldPanel('from_address', classname="col6"),
                FieldPanel('to_address', classname="col6"),
            ]),
            FieldPanel('subject'),
        ], "Email"),
    ]
We need to change the inheritance from AbstractEmailForm to WagtailCaptchaEmailForm:
from wagtailcaptcha.models import WagtailCaptchaEmailForm

class FormPage(WagtailCaptchaEmailForm):
    ....
Similarly, if your form uses AbstractForm, then use WagtailCaptchaForm.
At this point, this would be all you need to do to have a reCAPTCHA V2 checkbox rendered as the last field on your form with all the validation taken care of.
Create a Custom FormBuilder to Use reCAPTCHA V3
The reCAPTCHA field is added by wagtailcaptcha's custom form builder which doesn't include any widget specification. Since django-recaptcha defaults to the V2 checkbox, we need to create a custom form builder that specifies the V3 widget and a custom action. We then set this as the form_builder attribute in the form page to override the default.
from django_recaptcha.fields import ReCaptchaField
from django_recaptcha import widgets
from wagtailcaptcha.forms import WagtailCaptchaFormBuilder
from wagtailcaptcha.models import WagtailCaptchaEmailForm

class CaptchaV3FormBuilder(WagtailCaptchaFormBuilder):
    @property
    def formfields(self):
        fields = super(WagtailCaptchaFormBuilder, self).formfields
        fields[self.CAPTCHA_FIELD_NAME] = ReCaptchaField(label="", widget=ReCaptchaV3(action="form-submit"))
        return fields

class FormPage(WagtailCaptchaEmailForm):
    form_builder = CaptchaV3FormBuilder
    ....
Now your form will render with the V3 reCAPTCHA and validate accordingly.
The examples specifies an arbitrary action 'form-submit' - amend this to suit your use case.
Note that to provide a unique action for each form on your website, you would need to either create a custom form builder for each, or modify both the form class and form builder to take parameters. A suggested approach for this can be found here.
As before, we could also override the RECAPTCHA_REQUIRED_SCORE setting with:
widget=ReCaptchaV3(action='form-submit', attrs={'required_score':0.85})Modify the Page Template
If you're template renders the form as a class or loops through each field, you shouldn't need to adjust the page template.
Where you render the form fields manually, use the same form template mentioned previously in the django-recaptcha section, the difference is that the field name is now wagtailcaptcha rather than recaptcha:
<form action="{% pageurl page %}"
              enctype="multipart/form-data"
              method="post">
    {% csrf_token %}
    {% if form.non_field_errors %}
        <div class="alert alert-danger">
            {{ form.non_field_errors }}
        </div>
    {% endif %}
    {% if form.wagtailcaptcha.errors %}
        <div class="alert alert-danger">
            {{ form.wagtailcaptcha.errors }}
        </div>
    {% endif %}

    << -- other form fields -->>

    <div class="d-none">{{ form.wagtailcaptcha }}</div>
    <button type="submit" class="btn btn-primary">
        Submit
    </button>
</form>
Summary
There you have it. With only a very minimal amount of modification to existing code, you have a reCAPTCHA V3 protected Wagtail form.
Wagtail ReCaptcha provides an easy way to integrate the django-recaptcha package when using the Wagtail formbuilder.
Conclusion
This comprehensive guide has equipped you with the knowledge to enhance the security of your Django forms using Google reCAPTCHA V3 and its alternatives.
- We've explored the seamless integration of reCAPTCHA V3, offering a less intrusive and more accurate way to protect your forms from spam and bots.
- The guide also provided insights into the pro's and con's of switching to hCAPTCHA, a rising alternative endorsed by major players like Cloudflare.
- We delved into the practical steps of implementing these CAPTCHA solutions in Django forms, including direct implementation and using the
django-recaptchapackage for ease. - For Wagtail users, we covered the integration of reCAPTCHA V3 with Wagtail's form builder pages using the
wagtailcaptchapackage.
Remember, safeguarding your digital forms is not just about security; it’s about providing a smooth user experience that can lead to higher conversion rates.
Whichever CAPTCHA widget you choose, the goal remains the same: to protect your forms effectively while maintaining user-friendliness.