
Upgrade PostgreSQL Server: A Simplified Guide for Windows and Ubuntu
Introduction
Upgrading PostgreSQL server binaries and clusters is critical for ensuring the performance, security, and stability of your database. However, the official documentation for the process is overly-complicated and involved for a straightforward upgrade while also managing to omit some vital information.
In this post, we will simplify the process of updating PostgreSQL on both Windows and Ubuntu. The step-by-step approach is intended to clarify the update process, making clear instructions available to administrators of all ability levels.
Whether you're a new database administrator or a seasoned expert looking for a more basic upgrade method, this tutorial will provide you with the knowledge and confidence to successfully upgrade your PostgreSQL server without the need for lengthy documentation comprehension.
These steps are suitable for a standalone server without need for high availability. For more advanced needs, consult the PostgreSQL upgrade documentation.
Upgrading PostgreSQL Server on Windows
Before you start
As always, make sure you have a full backup before attempting any upgrades on your database. Read through the steps first and make a plan beforehand to make sure there are no surprises on the way through.
The steps described here will require taking the database offline briefly (dependent on the size of your cluster and the hardware you're running it on). The database will be copied to the new version and will run in parallel on a different port until you either disable the old version and change the port to the old one, or point your apps to the new port.
Upgrade Steps
1. Download and install the latest binaries
Start off downloading the latest installer from EDB's website.
Run the installer to update your current version to the latest release in that version. The installer is self-explanatory and follows a simple wizard interface.
It will prompt you with the information about existing installations and information about upgrading.
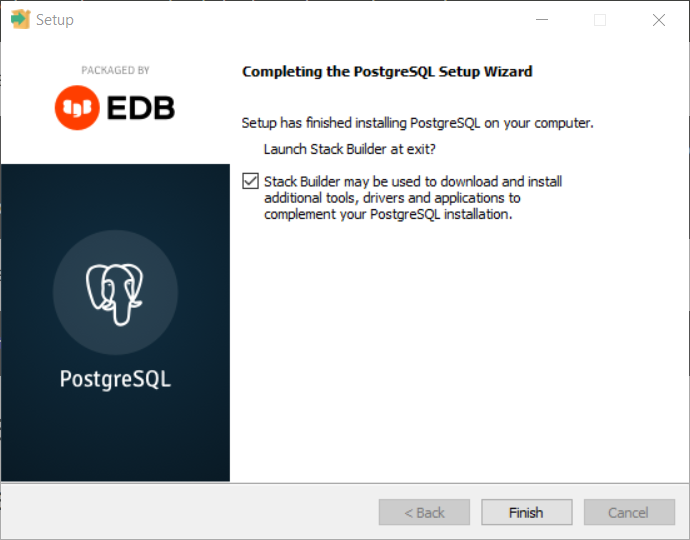
Once the initial setup is complete, you will see a prompt to launch the Stack Builder. Choose this path and follow the next step below.
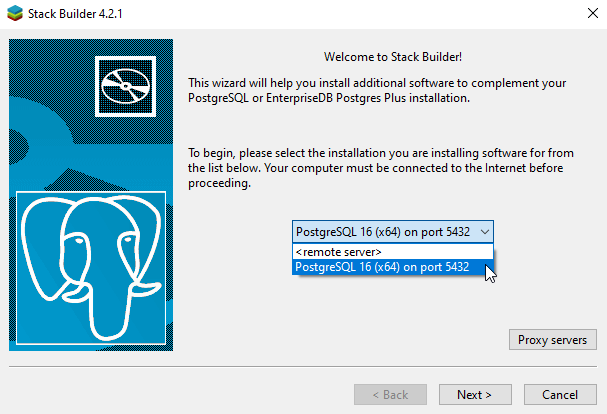
2. Install the new server version
This step does not upgrade your database but, instead, installs the necessary server and services for the new version.
You should have the Stack Builder Welcome page where you're prompted to select the PostgreSQL installation (either local or remote):
On the next page, expand the Database Server category and select the newer version you want to install.
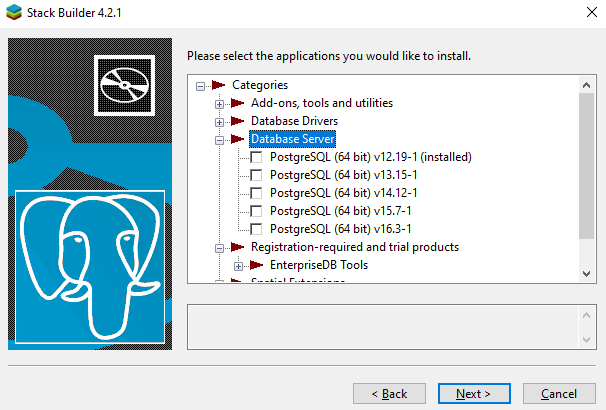
The installer will download the necessary installation package and take you through installing the new version. At the end of this, you will be prompted to start Stack Builder once again. Deselect this and finish the installation.
3. Stop PostgreSQL services
To ensure a seamless transfer, stop both the old and new PostgreSQL services.
Open the Services programme (press +R and type services.msc).
Stop any services named postgresql-x64-<<major_version>> or (postgresql-<<major_version>> for x32 servers) manually. For my case, the old and new services were postgresql-x64-12 and postgresql-x64-16.
Alternatively, stop the services using PowerShell/command prompt with the following commands:
net stop postgresql-x64-12
net stop postgresql-x64-16
Make sure you have also closed any running instances of pgadmin.
4. Configure Authentication
pg_upgrade establishes connections to the old and new PostgreSQL instances while performing the PostgreSQL upgrade. Nevertheless, there isn't a clear way to provide credentials. You'll need to temporarily change the authentication settings in <<data_dir>>/pg_hba.conf for both old and new server versions in order to get around this.
Scroll to lines 114-117 to find the IPv4/IPv6 settings and change the authentication from scram-sha-256 to trusted:
# IPv4 local connections:
host    all             all             127.0.0.1/32            scram-sha-256
# IPv6 local connections:
host all all ::1/128 scram-sha-256# IPv4 local connections:
host all all 127.0.0.1/32 trusted
# IPv6 local connections:
host all all ::1/128 trusted5. Upgrade the cluster with pg_upgrade
Start a command prompt with administrator rights.
Select a port number for the new server to run on. This can be temporary until you have determined that the upgrade was successful, but it must differ from the port number the current server is running on.
The syntax for pg_upgrade is:
"<<new_bin_dir>>\pg_upgrade.exe"
 --old-datadir="<<old_data_dir>>"
 --new-datadir="<<new_data_dir>>"
 --old-bindir="<<old_bin_dir>>"
 --new-bindir="<<new_bin_dir>>"
 --old-port=<<old_port_number>>
 --new-port=<<new_port_number>>
 -U postgres
You will need to use the paths and versions suitable for your case. In my case, I needed to use the following:
"C:\Program Files\PostgreSQL\16\bin\pg_upgrade.exe"
--old-datadir="C:\Program Files\PostgreSQL\12\data"
--new-datadir="C:\Program Files\PostgreSQL\16\data"
--old-bindir="C:\Program Files\PostgreSQL\12\bin"
--new-bindir="C:\Program Files\PostgreSQL\16\bin"
--old-port=5432 --new-port=5433
-U postgres
The program will run through consistency checks before performing the upgrade. See the note later regarding handling failures during this process.
At the end, you have a copy of your cluster running on your new server version with the port number that you specified.
6. Restart services
Reverse the temporary authentication changes you made in step 3 ( in <<data_dir>>/pg_hba.conf, set IPv4 and IPv6 authentication back to scram-sha-256 for both old and new server versions).
Restart the service for the new server (and old if still needed) either via the services panel app or from the command prompt.
7. Test the new cluster
Run through your test regime to ensure full functionality.
8. Drop the redundant clusters
Once you've verified that the new cluster works and you no longer require the old one, make sure the service is disabled for the old one.
If the new server is to be run on the original port that the previous server ran on, navigate to the data directory for the new server, edit postgresql.conf, L64 - change port number and restart the service.
- port = 5432
Drop the old cluster, most easily done from the pgAdmin interface (right click on the server and choose Remove Server).
Test again after dropping the cluster (and changing the port if applicable).
At this stage, you're safe to uninstall the old server and remove any remaining files left in Program Files\PostgreSQL\xx, where xx is the old version number.
Handling Upgrade Errors
During upgrade, at the end of consistency checks, you'll see this warning:
- If pg_upgrade fails after this point, you must re-initdb the new cluster before continuing.
What this means is that, if the upgrade encounters any errors, the process will exit out and leave a partially copied cluster in the new server.
It's important to understand that the upgrade process is non-destructive, your original cluster is untouched at this, and any, point in the upgrade process.
Once you eliminate the source of the error, you will need to either re-initialise the new cluster, or open up pgAdmin and drop any databases other than the postgres database. From Login/Group Roles, you will also need to remove any users other than the postgres user.
To do that from the command line, you would need something along the lines of:
net stop postgresql-x64-16
del /S /Q "C:\Program Files\PostgreSQL\16\data\*"
"C:\Program Files\PostgreSQL\16\bin\initdb.exe" --pgdata="C:\Program Files\PostgreSQL\16\data"
net start postgresql-x64-16
When running the upgrade, I encountered the following failure message:
- Consult the last few lines of "C:/Program Files/PostgreSQL/16/data/pg_upgrade_output.d/20240429T123336.929/log/pg_upgrade_dump_160490.log" for the probable cause of the failure.
- Failure, exiting
The log file included the following:
- pg_restore: error: could not execute query: ERROR: could not open unaccent file "C:/Program Files/PostgreSQL/16/share/tsearch_data/deaccent.rules": No such file or directory
- Command was: CREATE TEXT SEARCH DICTIONARY "public"."unaccent" (
- TEMPLATE = "public"."unaccent",
- rules = 'deaccent' );
- -- For binary upgrade, handle extension membership the hard way
- ALTER EXTENSION "unaccent" ADD TEXT SEARCH DICTIONARY "public"."unaccent";
I'm using unaccent with my search indexing, for some reason the upgrade doesn't copy across the de-accent rules list. Once I'd done that, I needed to re-initialise the cluster and restart the upgrade.
If you don't remove the databases (other than postgres) from the aborted upgrade, you'll see an error stating that the cluster database is not empty, similar to the following:
- New cluster database "<< existing database name >>" is not empty: found relation "public.some_relation_name"
- Failure, exiting
If there are users other than postgres, you will see:
- Only the install user can be defined in the new cluster.
- Failure, exiting
Upgrading PostgreSQL Server on Ubuntu
Before Starting
Make sure your Ubuntu server is updated and that you have an up-to-date backup before starting this.
This guide is for small to medium databases that don't need high availability (always on) and can tolerate brief periods offline. For large HA clusters, you'll need to consult the upgrade docs on using hard-links rather than binary copies etc.
I recommend making a copy of your server and making a test run first in case of any hidden 'surprises'.
Upgrading PostgreSQL will inevitably require taking the database server offline - how long that will be will obviously be dependent on your cluster size and hardware specs. For my case, with a cluster size of 100MB, on a low spec server, it needed around 2 seconds offline.
You can check your cluster size from the psql prompt:
sudo -u postgres psqlSELECT pg_size_pretty(sum(pg_database_size(datname))) AS "Total Cluster Size"
FROM pg_database;- Total Cluster Size
- --------------------
- 103 MB
- (1 row)
While there, you can list out the databases in that cluster using \l
postgres=# \l
                                                         List of databases
     Name      |  Owner   | Encoding | Locale Provider | Collate |  Ctype  | ICU Locale | ICU Rules |       Access privileges
---------------+----------+----------+-----------------+---------+---------+------------+-----------+-------------------------------
 some_db       | postgres | UTF8     | libc            | C.UTF-8 | C.UTF-8 |            |           | =Tc/postgres                 +
               |          |          |                 |         |         |            |           | postgres=CTc/postgres        +
               |          |          |                 |         |         |            |           | some_db_admin=CTc/postgres
 postgres      | postgres | UTF8     | libc            | C.UTF-8 | C.UTF-8 |            |           |
 template0     | postgres | UTF8     | libc            | C.UTF-8 | C.UTF-8 |            |           | =c/postgres                  +
               |          |          |                 |         |         |            |           | postgres=CTc/postgres
 template1     | postgres | UTF8     | libc            | C.UTF-8 | C.UTF-8 |            |           | =c/postgres                  +
               |          |          |                 |         |         |            |           | postgres=CTc/postgres
Find Installed Instances
To find the installed versions of PostgreSQL, use the following command:
dpkg --get-selections | grep postgres- postgresql install
- postgresql-12 install
- postgresql-14 install
- postgresql-client-12 install
- postgresql-client-14 install
- postgresql-client-common install
- postgresql-common install
- postgresql-contrib install
In this example, there are two versions running. Version 12 from the previous LTS before upgrading Ubuntu, and version 14 from the current LTS.
PostgreSQL Apt Repository
In my case, the upgraded LTS had been out for a couple of years already and the current PostgreSQL server version was 16. The LTS only offered up to version 14. My goal was to hop straight from 12 to 16.
If the version available with your Ubuntu installation is not what you're looking for, you can use the PostgreSQL Apt Repository. This repository will integrate with your existing systems and patch management providing automated updates for all supported PostgreSQL versions for the duration of PostgreSQL's support lifecycle.
To configure your repository for automated configuration:
sudo apt install -y postgresql-common
sudo /usr/share/postgresql-common/pgdg/apt.postgresql.org.sh
You should see something similar to the following when running the above:
- This script will enable the PostgreSQL APT repository on apt.postgresql.org on your system. The distribution codename
used will be jammy-pgdg. - Press Enter to continue, or Ctrl-C to abort.
Once that has finished, you will see the message:
- You can now start installing packages from apt.postgresql.org.
Upgrade Steps
1. Upgrade the core PostgreSQL packages
sudo apt-get upgrade- The following packages have been kept back:
- postgresql postgresql-12 postgresql-14 postgresql-contrib
- The following packages will be upgraded:
- libpq-dev libpq5 postgresql-client-12 postgresql-client-14 postgresql-client-common postgresql-common
- 6 upgraded, 0 newly installed, 0 to remove and 4 not upgraded.
2. Add version specific libraries
If you list the PostgreSQL installations again, you'll see that even though you've upgraded the PostgreSQL core, there is no cluster for the latest version.
dpkg --get-selections | grep postgres- postgresql install
- postgresql-12 install
- postgresql-14 install
- postgresql-client-12 install
- postgresql-client-14 install
- postgresql-client-common install
- postgresql-common install
- postgresql-contrib install
If you want a specific version, append the version number to the package name (e.g. postgresql-16) instead of postgresql:
sudo apt -y install postgresql-16Repeat the listings and you'll the version 16 server and client libraries have been added and that a version 16 cluster has also been added:
dpkg --get-selections | grep postgres- postgresql install
- postgresql-12 install
- postgresql-14 install
- postgresql-16 install
- postgresql-client-12 install
- postgresql-client-14 install
- postgresql-client-16 install
- postgresql-client-common install
- postgresql-common install
- postgresql-contrib install
pg_lsclusters- Ver Cluster Port Status Owner Data directory Log file
- 12 main 5432 online postgres /var/lib/postgresql/12/main /var/log/postgresql/postgresql-12-main.log
- 14 main 5433 online postgres /var/lib/postgresql/14/main /var/log/postgresql/postgresql-14-main.log
- 16 main 5434 online postgres /var/lib/postgresql/16/main /var/log/postgresql/postgresql-16-main.log
3. Stop PostgreSQL services
To safely move our database, we need to disable any services that use PostgreSQL.
sudo service postgresql stop4. Rename the new PostgreSQL version's default cluster.
When you install Postgres packages, a default cluster is added that you can be used. You need to rename the new PostgreSQL cluster so that the names do not clash when we update the old cluster.
Change the version number below (16) to match your new version:
sudo pg_renamecluster 16 main main_pristine5. Upgrade the old cluster
Replace the version number below (12) to match your old version:
sudo pg_upgradecluster 12 main6. Restart services
Start the services again with:
sudo service postgresql startYou should see that the old cluster is down and the new version of PostgreSQL is online:
$ pg_lsclusters
Ver Cluster       Port Status Owner    Data directory                       Log file
12  main          5435 down   postgres /var/lib/postgresql/12/main          /var/log/postgresql/postgresql-12-main.log
14  main          5433 online postgres /var/lib/postgresql/14/main          /var/log/postgresql/postgresql-14-main.log
16  main          5432 online postgres /var/lib/postgresql/16/main          /var/log/postgresql/postgresql-16-main.log
16  main_pristine 5434 online postgres /var/lib/postgresql/16/main_pristine /var/log/postgresql/postgresql-16-main_pristine.log
7. Test the new cluster
Run through your test regime to ensure full functionality.
8. Drop the redundant clusters
Once you've verified that the new cluster works and you no longer require the old one, you may remove it and the 'pristine' cluster copy that we made above. In my case, since version 14 was leap-frogged, I can drop this as well:
sudo pg_dropcluster 12 main --stop
sudo pg_dropcluster 14 main --stop
sudo pg_dropcluster 16 main_pristine --stop
9. Clean up unused packages
Test again after dropping the old clusters.
Once you are happy that you have a successful upgrade, you can remove all the now-redundant packages as well:
sudo apt autoremove- Reading package lists... Done
- Building dependency tree... Done
- Reading state information... Done
- The following packages will be REMOVED:
- libasn1-8-heimdal libffi7 libgssapi3-heimdal libhcrypto4-heimdal libheimbase1-heimdal libheimntlm0-heimdal libhx509-5-heimdal libicu66 libkrb5-26-heimdal
- libldap-2.4-2 libllvm10 libroken18-heimdal libssl1.1 libwind0-heimdal postgresql-12 postgresql-client-12
- 0 upgraded, 0 newly installed, 16 to remove and 3 not upgraded.
- After this operation, 162 MB disk space will be freed.
- Do you want to continue? [Y/n]
Handling Upgrade Errors
It's important to remember that the upgrade process is non-destructive, the original cluster is untouched by this.
As with Windows upgrade errors, if for some reason you encounter an error, you will need to work through the logs and remedy the cause. Once you have done that, you will most likely need to remove the partially filled cluster before continuing.
For the Ubuntu process, it is a little easier as we just need to drop the cluster with:
sudo pg_dropcluster xx main --stopwhere xx is the new version you are upgrading to.
Conclusion
In this article, we went through installing and upgrading PostgreSQL on both Windows and Ubuntu for standard standalone servers.
We covered how to upgrade existing clusters, ensuring that your data and configurations are easily moved to the new version. In addition, we went over what to do if the update fails and how to restart it afterwards.
For Ubuntu users, we highlighted the benefits of using the PostgreSQL repository to obtain the precise release required, ensuring you have access to the latest features and security updates.
By following these steps, you can confidently upgrade your PostgreSQL server and maintain a robust database environment.