
Creating Custom Django Form Widgets with Responsive Front-End Behaviour
Introduction
Django form widgets are a cornerstone of the Django web framework, playing a vital role in rendering HTML form elements and managing user input efficiently. Think of them as a bridge between your Python code and the HTML interface, making it easier to create, display, and process form fields in online applications.
One notable aspect of Django's built-in widgets is server-side validation. This guarantees that user-submitted data complies with the set limits, thereby improving the security and integrity of your online forms.
Furthermore, widget rendering and validation are also very customizable. You have complete control over the design and functionality of your form fields, including the addition of client-side components to create dynamic, responsive behaviour.
In the upcoming example, we'll explore the process of enhancing an existing Django widget to add new functionality. In the previous two articles, I used the scenario of importing text into a <textarea> via file uploads or drag-and-drop actions to create interactive blocks and field panels. While those examples served as proof-of-concepts, this case is a perfect candidate for widget implementation.
For Wagtail users, the benefit of this approach is its versatility. Not only can you employ the same widget within FieldPanels and Blocks, but you'll also appreciate the substantial reduction in coding effort. It's a win-win for streamlining your web development tasks.
Creating the Widget Class
When constructing online forms in Django, the render function of a widget class is a critical component of how Django handles the rendering of form fields to HTML. It is a critical method that specifies how a certain form field linked with the widget will be presented in the web browser as an HTML input element. Here is a brief description of what the render method performs and why it is important:
- HTML Generation: The render method's principal function is to produce HTML markup for presenting a form field on a web page. This method accepts the name of the form field, its current value, and any additional attributes or data needed for rendering.
- Customization: Overriding the render method allows developers to change how a form field is presented. This might involve defining HTML attributes (such as class, id, or placeholder), controlling the HTML structure around the form field (for example, enclosing it in a
<div>or other HTML element) and, importantly for this example, adding JavaScript to handle form interaction.
We can use Wagtail's AdminAutoHeightTextInput widget for this example because the auto height code is already there. This also allows us to call the render method of that class and then add our own HTML to the returned markup.
If you're using Django instead of Wagtail, you should inherit django.forms.widgets.Textarea instead.
Since we will be adding a file picker, we can add an optional file type filter as before (this is implemented by the accept attribute of the input element).
ImportTextAreaWidget
Our widget class needs to perform two main tasks:
- Create extra markup for the rendered form widget using the
render()function. We'll need an<input>element withtype=fileand optionalacceptattribute, as well as some help text. Both of these elements will be wrapped within aflexcontainer. We'll also add a<script>tag to create an instance of our widget JavaScript class. - Set the
media()function to define extra JavaScript and CSS for Django to use with this widget. The JavaScript will include the event listeners and functionality required to handle drag/drop and file input events.
from django import forms
from django.template.loader import render_to_string
from django.utils.functional import cached_property
from django.utils.translation import gettext_lazy as _
from wagtail.admin.widgets import AdminAutoHeightTextInput

class ImportTextAreaWidget(AdminAutoHeightTextInput):
    def __init__(self, file_type_filter=None, attrs={}):
        self.file_type_filter = file_type_filter
        self.accept = self.file_type_filter
        if not attrs.get("rows"):
            attrs["rows"] = 5
        super().__init__(attrs)

    def render(self, name, value, attrs, renderer=None):
        context = {
            "id": f'{attrs.get("id")}',
            "label": _("Choose file"),
            "help": _("Use 'Choose File' or drag/drop to import data from file."),
            "accept": self.accept,
        }
        return super().render(
                name, value, attrs, renderer
            ) + render_to_string(
                "widgets/import_textarea_widget.html", context
            )

    @cached_property
    def media(self):
        widget_media = super().media
        return forms.Media(
            js=widget_media._js + ["js/widgets/import-textarea-widget.js"],
            css={"all": ("css/widgets/import-textarea-widget.css",)},
        )
render()
We first call super().render() to get the base markup for the widget from the inherited class, then render our custom markup to add to this (we'll create the template next). This case is straightforward as we are only appending to and not amending the base template. If you need to insert or adjust the rendered code from the super() method, you will need to do this via a method such as BeautifulSoup in Python or in your JavaScript class.
I'm defining static template text in the context rather than directly in the template to keep it multi-lingual friendly. If this is not needed for your use case, amend as needed.
media()
First, use the super().media() method to find any additional media associated with your inherited class, then add any media required for the custom widget. Note the slightly different format for js and css. We'll create these files after the template.
I'm defining the widget in my core Django app; use an appropriate app for your case.
One other small detail: I'm setting the default row count to 5 instead of the usual 10 that comes as standard. Personal preference only, it makes the empty <textarea> a bit more compact. Edit/remove as you prefer.
Widget Template
For our example, the form field markup is already given to us via super().render(). Our additional markup will render the file input button and help text.
I hide the actual input button and instead format the label as a button. Clicking on the label has the same effect as clicking on the button due to the label's for attribute.
The main reason for doing this is to hide the value of the picked file, which is irrelevant for the user (and potentially confusing since the file is only read during import and discarded afterwards).
The other reason is that it's very difficult to style the input button, this is normally controlled by the browser. The label is ours to style as we like. In this case, I've added a button CSS class to the label which Wagtail will style in the admin already for us. Outside of this, use something equivalent to the Boostrap btn class.
<div class="import-textarea-fileinput-container">
    <input type="file"
           hidden=""
           id="{{ id }}-file-input"
           {% if accept %}accept="{{ accept }}"{% endif %}
    >
    <label class="button" for="{{ id }}-file-input">{{ label }}</label>
    <span class="help">{{ help }}</span>
    <script>new ImportTextAreaWidget('{{ id }}')</script>
</div>- We create a unique ID for the input and label elements since this widget may appear multiple times on the same page.
- The
<input>element has the hidden attribute. The accept parameter is added conditional to a value foracceptbeing passed to the template. - A
<script>element creates a new instance of a JavaScriptImportTextAreaWidgetclass, which we will define later in the article. This class will add interactive functionality to the widget. We'll be passing the unique identifier for the form field that we got in the render method above. This will be theidvalue for the<textarea>element rendered by Django.
CSS
We've a little styling needed for our rendered widget:
- Set the overflow attributes on the text area to auto on vertical only and set a maximum height to 25em to limit the height after importing a large amount of data (adjust as needed). We'll add this class to the text area in the JS next.
- Set our added markup container to
flexwith centred vertical alignment and a little top padding to push it down a little from the text area. - Set the
pointerandfont-weighton the label, and turn offflex-shrinkto prevent it from shrinking on small screens. - Add a little space to the left of the help text.
.import-textarea {
    overflow: hidden auto !important;
    max-height: 25em;
}

.import-textarea-fileinput-container {
    padding-top: 1em;
    display: flex;
    align-items: center;
}

.import-textarea-fileinput-container > label {
    cursor: pointer;
    font-weight: 600;
    flex-shrink: 0;
}

.import-textarea-fileinput-container > span {
    margin-left: 2em;
}
JavaScript
Everything is in place now except the code to read data from a file into the text area.
Our widget template creates an instance of an ImportTextAreaWidget JavaScript class, we need to define this now:
class ImportTextAreaWidget {
    constructor(id) {
        this.textArea = document.getElementById(id);
        this.textArea.classList.add('import-textarea')
        this.fileInput = this.textArea.parentElement.querySelector(`input#${id}-file-input`);
        // event listeners
        this.textArea.addEventListener('dragover', (event) => { this.handleDragOver(event); });
        this.textArea.addEventListener('drop', (event) => { this.handleDrop(event); });
        this.textArea.addEventListener('import', (event) => { this.handleImport(event); });
        this.fileInput.addEventListener('change', (event) => { this.handleFileInputChange(event); });
    }

    readFile(source, target) {
        const reader = new FileReader();
        reader.addEventListener('load', (event) => {
            target.value = event.target.result;
            this.textArea.dispatchEvent(new Event('input'));
            this.textArea.dispatchEvent(new Event('import'));
        });
        reader.readAsText(source);
    }

    handleFileInputChange(event) {
        event.preventDefault();
        const input = this.fileInput.files[0];
        this.readFile(input, this.textArea);
        this.fileInput.value = '';
        this.fileInput.blur();
    }

    handleDragOver(event) {
        event.stopPropagation();
        event.preventDefault();
        event.dataTransfer.dropEffect = 'copy';
    }

    handleDrop(event) {
        event.stopPropagation();
        event.preventDefault();
        const input = event.dataTransfer.files[0];
        this.readFile(input, this.textArea);
    }

    isElementInViewport(element) {
        const rect = element.getBoundingClientRect();
        return rect.top >= 50 && rect.top < window.innerHeight;
    };

    handleImport(event) {
        if (!this.isElementInViewport(this.textArea)) {
            setTimeout(() => {
                this.textArea.scrollIntoView({ behavior: "smooth" });
            }, 200);
        }
    }
}- The constructor finds the element with the passed ID — in our case, the text area — and adds the
import-textareacss class defined above. - In the widget template, the file input element was created with the suffix
-file-inputadded to the text areaid. We can use the query selectorinput#${id}-file-inputto find that element. - Once we have those two elements, we add the event listeners to handle drag/drop on the text area, and for the file input element. I explained the code behind these in a previous article in case you're interested in learning more.
- In this example, I'm adding a custom event called
import. This is just to improve UX (explained below) and is called whenever a file is read.
Because I'm inheriting Wagtail's AdminAutoHeightTextInput widget, I don't need to write resizing code for the text area. However, updating a text area's value from code will not trigger any events that would fire the resize code, so this is done using .dispatchEvent() to raise the input event.
I use the same method to raise the custom import event to fire handleImport(). As mentioned earlier, this is purely a UX feature that ensures the text area remains visible after importing text. If the top of the text area is off the top of the page, the window will scroll to the top edge of the text area after importing text. Without this, if the text area height were to shrink after importing text, it could potentially disappear from view completely.
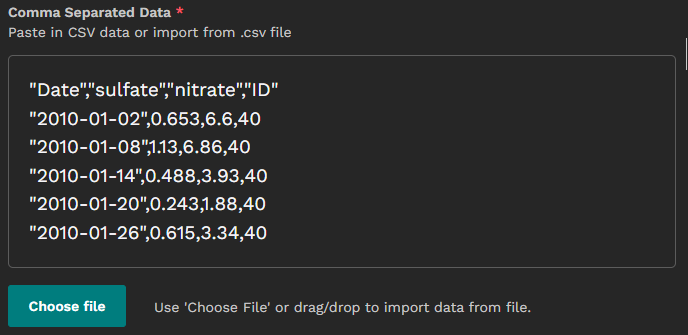
Rendered Widget
At this stage, our widget is rendered similarly to the following. This is a working example, you can use the "Choose File" button, or drag/drop a plain text file into the text area to read the contents into the textarea:
Implementing the Widget in Wagtail
The first two minor releases of Wagtail 6.1 (<6.1.2) had a change so that only the first HTML node in a widget was rendered. If the widget had more than one top-level node, the subsequent nodes would be dropped from the render. This was fixed in 6.1.2, but it means the code on this page is not compatible with 6.1.0 or 6.1.1.
FieldPanels
The most straightforward way is to simply set the FieldPanel with the widget attribute set (with or without additional parameters):
FieldPanel('some_text_field', widget=ImportTextAreaWidget)
# or
FieldPanel('some_text_field', widget=ImportTextAreaWidget(file_type_filter='.csv')),
Another option is to create a dedicated FieldPanel:
class ImportTextAreaPanel(FieldPanel):
    """
    TextField panel with option to import from file or drag/drop.
    file_type_filter: any valid accept string
    https://developer.mozilla.org/en-US/docs/Web/HTML/Attributes/accept
    """

    def __init__(
        self,
        field_name,
        disable_comments=None,
        permission=None,
        read_only=False,
        file_type_filter=None,
        **kwargs,
    ):
        kwargs.update({'widget': ImportTextAreaWidget(file_type_filter=file_type_filter)})
        self.file_type_filter = file_type_filter
        super().__init__(
            field_name = field_name,
            disable_comments = disable_comments,
            permission = permission,
            read_only = read_only,
            **kwargs
            )

    def clone_kwargs(self):
        kwargs = super().clone_kwargs()
        kwargs.update(
            field_name=self.field_name,
            disable_comments=self.disable_comments,
            permission=self.permission,
            read_only=self.read_only,
            file_type_filter = self.file_type_filter,
        )
        return kwargs

    def on_model_bound(self):
        if not isinstance(self.db_field, TextField):
            raise ImproperlyConfigured(
                _("ImportTextFieldPanel should only be used with TextFields")
            )
return super().on_model_bound()- Remove
widgetfrom the class constructor. - Create an instance of
ImportTextAreaWidgetto add to thekwargsand pass this through to theFieldPanelconstructor. - Override
clone_kwargsto dropwidget - Use the
on_model_bound()method to check that aTextField(or subclass ofTextField) has been passed to thefieldparameter.
You can then call this panel in place of FieldPanel:
ImportTextAreaPanel('some_text_area'),
#or
ImportTextAreaPanel(
    'some_text_area',
    file_type_filter='.txt,text/plain'
),
Blocks
How you implement this will depend on the nature of your widget. In most cases, your widget will be used against a FieldBlock type, such as a TextBlock in this case. To keep code manageable and re-usable, create a Block type that uses your widget and call that block from more complex StructBlocks if necessary.
For this example, we've created a widget for a text area, so we'll start by inheriting TextBlock and setting the properties for the widget in the field property:
from django import forms
from django.utils.functional import cached_property
from wagtail.blocks import TextBlock
from core.widgets import ImportTextAreaWidget

class ImportTextBlock(TextBlock):
    """
    TextArea block with option to import from file or drag/drop.
    file_type_filter: any valid accept string
    https://developer.mozilla.org/en-US/docs/Web/HTML/Attributes/accept
    """

    def __init__(
        self,
        required=True,
        help_text=None,
        rows=5,
        max_length=None,
        min_length=None,
        file_type_filter=None,
        validators=(),
        **kwargs
    ):
        super().__init__(
            required, help_text, rows, max_length, min_length, validators, **kwargs
        )
        self.file_type_filter = file_type_filter

    @cached_property
    def field(self):
        field_kwargs = {
            "widget": ImportTextAreaWidget(
                self.file_type_filter, attrs={"rows": self.rows}
            )
        }
        field_kwargs.update(self.field_options)
return forms.CharField(**field_kwargs)- The default minimum height for the text area is set to 5 rows
- The
widgetis set infield_kwargsalong with an optionalfile_type_filterpassed into the block constructor
Compare the amount of code using a widget with the StructBlockAdapter method discussed in the previous article. Using a widget is far more concise and simpler to work with. Where your code is working with only one field, use a widget. If you're code needs to interact with multiple fields simultaneously, the StructBlockAdapter will be required.
This block will now function as a standalone block, or can be incorporated into a StructBlock. For example:
class CSVTableBlock(StructBlock):
    title = CharBlock(required=False, label=_("Table Title"))
    data = ImportTextBlock(
        label=_("Comma Separated Data"),
        help_text=_("Paste in CSV data or import from .csv file"),
        file_type_filter='.csv'
    )
Conclusion
In this article, we covered how to make custom Django form widgets with responsive front-end behaviour.
- We went over how to enhance an existing Django widget to add new functionality, such as importing text into a
<textarea>via file input or drag-and-drop actions, as well as how to create a custom widget class, define therenderandmediafunctions, and create the widget template, CSS, and JavaScript code. - We looked at ways to use FieldPanels and Blocks to implement the custom widget in Wagtail, including developing a custom FieldPanel and Block utilising the widget.
- We discovered that utilising a widget is more succinct and easier than maintaining separate code for panels and blocks, and that it eliminates the need to develop a
StructBlockAdapter.
Please feel free to leave any questions or comments below, or send me a message here