
Importing Text From File Into a textarea HTML Form Field
Introduction
There is often a need to create a text field in a model that stores information you may have saved elsewhere as a plain text file such as configuration files or CSV values that you might want to render as an HTML table, but you only want the contents, not to upload the file to your web server.
The first part of this article takes you through the necessary front-end code to enable this from two different events: from a file input button change event, and from a (mouse) drop event.
In the second part, we'll implement this in a custom Wagtail FieldPanel that you can use with a standard Django textfield.
The next article will show you how to use the same front end process in a reusable StructBlock.
Note
For clarity, the aim of this article is to augment atextareaform field with the ability to read plain text from a local file, not to create a file upload tool.
Reading a File With JavaScript
The FileReader Object
The JavaScript FileReader object provides a way to read the contents of a file asynchronously. To read a file, you first create a new instance of the FileReader object then attach an event listener to the object's load event, which fires when the file is successfully loaded.
Inside the event listener, you can access the file contents using the result property of the FileReader object. The reading process by calling the readAsText(), readAsDataURL() or readAsArrayBuffer() method, passing in the file you want to read as the parameter. Since this example is dealing with plain text files, we'll be using readAsText().
The FileReader object asynchronously reads the file, and when completed, triggers the load event, allowing you to access and work with the file's contents. Here, we'll be taking that result and setting it to the textarea value attribute.
Since the process for reading a file from either an input element or a drag/drop event, we'll create a single method readFile() and pass in the filename from either event.
Reading a file from an input element
Using <input type="file"/> gives us the familiar 'Choose File' button. We'll add an listener to trigger on the change event and pass the returned file name into the readFile() method. Once that has passed, in this case, it's important to clear the value attribute of the input control. The reason for this is that if the editor notices a mistake in the file contents, updates the file and reselects the file from the input control, the change event will not be triggered again if that value has been left after the last event. Clearing the value ensures the change event is triggered each time. We'll also blur() the control to take the focus off the file chooser button after the read operation.
Using preventDefault to perform custom actions
By calling event.preventDefault(), the default behaviour of the change event is suppressed, preventing the file selection dialog from opening.
The reason preventDefault() is used in this context is to handle the file selection process manually using the readFile() function and custom logic. By preventing the default behaviour, you can take control of how the selected file is processed, read, and passed to the readFile() function.
Reading a file from a drag/drop event
To enable this on the textarea control, we add event listeners for the dragover and drop events.
The dragover event is just to provide some visual feedback that the control is available for drag/drop by setting event.dataTransfer.dropEffect to copy.
The drop event provides us with a list of files via the dataTransfers.files attribute of the event. For this purpose, we will only take the first file in the list in the case that multiple files have been selected for one drop.
Using stopPropagation to prevent event bubbling.
The stopPropagation() method is used in JavaScript to prevent the propagation of events from reaching further elements in the DOM tree. When applied to the dragover and drop events, it allows you to control the event flow during drag and drop interactions. By calling stopPropagation() on these events, you prevent them from triggering any event listeners on parent or ancestor elements. This ensures that only the intended element receives and handles the drag and drop events, avoiding unwanted side effects or conflicting behaviours caused by event bubbling.
Initialising the Form Controls
Because this text field control could be used multiple times on one form, we need to make sure there are unique events for each instance. We'll create a JavaScript that receives an ID and initialises the necessary elements. We'll later add this id to the panel wrapper and instantiate the class with this ID:
class ImportTextFieldPanel {
    constructor(id) {
        this.wrapper = document.querySelector(`[data-field-wrapper="${id}"]`);
        this.fileInput = this.wrapper.querySelector('input');
        this.textArea = this.wrapper.querySelector('textarea');

        this.textInitialHeight = this.textArea.style.height;
        if (this.textArea.style.maxHeight === '') {
            this.textArea.style.maxHeight = '30em';
        }
        this.textArea.style.overflowY = 'auto';

        this.fileInput.addEventListener('change', this.handleFileInputChange.bind(this));

        this.textArea.parentElement.addEventListener('dragover', this.handleDragOver.bind(this));
        this.textArea.parentElement.addEventListener('drop', this.handleDrop.bind(this));
    }

    readFile(source, target) {
        const reader = new FileReader();
        reader.addEventListener('load', (event) => {
            target.value = event.target.result;
            target.style.height = this.textInitialHeight;
            target.style.height = target.scrollHeight
                + parseFloat(getComputedStyle(target).paddingTop)
                + parseFloat(getComputedStyle(target).paddingBottom) + 'px';
        });
        reader.readAsText(source);
    }

    handleFileInputChange(event) {
        event.preventDefault();
        const input = this.fileInput.files[0];
        this.readFile(input, this.textArea);
        this.fileInput.value = '';
        this.fileInput.blur();
    }

    handleDragOver(event) {
        event.stopPropagation();
        event.preventDefault();
        event.dataTransfer.dropEffect = 'copy';
    }

    handleDrop(event) {
        event.stopPropagation();
        event.preventDefault();
        const input = event.dataTransfer.files[0];
        this.readFile(input, this.textArea);
    }
}
As well as the event listeners described previously, the function performs the following tasks:
- It receives an ID for the field panel wrapper element's
data-field-wrapperattribute and retrieves that node object from the DOM. Thetextareaand fileinputchild elements are stored astextFieldandfileInput. Note, thedata-field-wrapperattribute is a Wagtail feature. If you're using another platform, just wrap the text and input elements in a container use an appropriate attribute to return that container's node in the DOM. Adust the class contruct method as needed. textInitialHeightstores the initial height of thetextFieldelement, used in dynamically setting thetextareaheight after a read file event..- It checks for a
maxHeightattribute on thetextFieldelement. If there is none, it sets themaxHeightproperty to '30em'. This ensures that thetextFieldelement has a maximum height to prevent the control from growing oversized after reading a large file. - It sets the
overflowYproperty of thetextFieldelement's style toauto. This enables vertical scrolling when the content exceeds themaxHeightof thetextFieldelement. - It defines a function called
readFilethat takes two parameters:sourceandtarget. This function is responsible for reading the contents of a file selected by the user and displaying the content in thetargetelement. It uses theFileReaderAPI to read the file contents asynchronously.- The
readFilefunction creates a newFileReaderobject, attaches an event listener to it and sets up a callback function to handle theloadevent. When the file is successfully loaded, the callback function is executed. - In the callback function, it assigns the loaded file's contents to the
valueproperty of thetargetelement (in this case, thetextareaelement). The height of thetargetelement is adjusted dynamically to fit the content properly based on thescrollHeightof thetargetelement plus the top and bottom padding. - Finally, it calls the
readAsTextmethod of theFileReaderobject, passing in thesourcefile object. This initiates the process of reading the file as text.
- The
Example textarea with File Reading Enabled
Create a simple form with the following HTML (assumes you have the ImportTextFieldPanel JavaScript class loaded and Bootstrap enabled):
<style>
    .textarea-fileinput, .textarea-fileinput::file-selector-button {
        width: 10em;
    }
</style>
<div data-field-wrapper="some_text_area">
    <form class="bg-light p-3 rounded mx-md-5">
        <textarea class="overflow-auto form-control mb-2 w-100"></textarea>
        <input type="file" class="form-control textarea-fileinput">
    </form>
</div>
<script>
    new ImportTextFieldPanel("some_text_area");
</script>
This gives you a form similar to the following:
This is a working form, feel free try the 'Choose File' button and drag/drop with a test text file to see it in action.
I'm setting the input element and the file selector button to the same width with
.textarea-fileinput, .textarea-fileinput::file-selector-button { width: 10em; }I'm doing this in order to hide selected file text that the input element would normally display. Because we set the input value to to empty after each file read operation, this will always display "No file selected" and would possibly be confusing for the editor.
An alternative to this is to set a unique id on the <input> element and hide it, create a <label> with the for attribute equal to the uid of the <input> and style it as a button.
<form class="bg-light p-3 rounded mx-md-5">
    <textarea class="overflow-auto form-control mb-2 w-100"></textarea>
    <input type="file" id={{ id }} hidden="" class="form-control textarea-fileinput">
    <label for={{ id }} class="btn btn-primary">Choose File</label>
</form>Creating a Custom Wagtail Field Panel
The example below is intended as a demonstration of the technique to create a custom FieldPanel with JavaScript interaction rather than a solution to the case of adding file reading ability to a text area. A better solution for that case using a custom widget is given in the this article.
I'll assume you have a working knowledge of Wagtail's FieldPanel for this, it's beyond the scope of this article to cover that in depth.
If not, in a nutshell, this is the class that provides the relevant form control for most field types in Wagtail's CMS. You can easily sublass this and add keyword attributes via the clone_kwargs() method which will then be available to the BoundPanel. BoundPanel is, as the name suggests, where the form control is bound to the named field name in the model. The render_html() method is where the magic happens to render the control on the editor form.
You can find more complete information on Wagtail's Panel API documentation.
Important
This article assumes you are using Wagtail 3.x or higher. The FieldPanel is not present in earlier versions.
Adding a file type filter
The file input element can take an accept attribute to limit the types of files the editor can choose from the pop out file dialog. See the Mozilla Developer docs for a full explanation of these.
We'll add this an option to the FieldPanel kwargs and check for this when rendering the form control HTML.
Note, this only affects the file input control. It does not prevent files of other types being drag/dropped onto the text area.
ImportTextFieldPanel
from bs4 import BeautifulSoup
from django.core.exceptions import ImproperlyConfigured
from django.utils.safestring import mark_safe
from django.utils.translation import gettext_lazy as _
from wagtail.admin.panels import FieldPanel


class ImportTextFieldPanel(FieldPanel):
    """
    TextArea form field with option to import from file or drag/drop.
    file_type_filter: any valid accept string
    https://developer.mozilla.org/en-US/docs/Web/HTML/Attributes/accept
    """

    def __init__(self, field_name, file_type_filter=None, *args, **kwargs):
        self.file_type_filter = file_type_filter
        super().__init__(field_name, *args, **kwargs)

    def clone_kwargs(self):
        kwargs = super().clone_kwargs()
        kwargs.update(
            file_type_filter=self.file_type_filter,
        )
        return kwargs

    class BoundPanel(FieldPanel.BoundPanel):
        def __init__(self, **kwargs):
            super().__init__(**kwargs)
            self.accepts = (
                f'accept="{self.panel.file_type_filter}" '
                if self.panel.file_type_filter
                else ""
            )

        msg = {
            "file_label": _("Use 'Choose File' or drag/drop to import data from file."),
        }

        @mark_safe
        def render_html(self, parent_context=None):
            html = super().render_html(parent_context)
            soup = BeautifulSoup(html, "html.parser")
            text_area = soup.find("textarea")
            if not text_area:
                raise ImproperlyConfigured(
                    _("ImportTextFieldPanel should only be used with TextFields")
                )
            text_area["class"] = text_area.get("class", []) + ["import_text_area"]
            wrapper = soup.find(attrs={"data-field-wrapper": True})
            wrapper["data-field-wrapper"] = self.id_for_label()
            wrapper.append(self.import_text_field_button())
            wrapper.append(self.initialise_panel())
            return str(soup)

        def import_text_field_button(self):
            return BeautifulSoup(
                """
                <div class="textarea-fileinput-container">
                    <input type="file" class="textarea-fileinput"
                     """ + self.accepts + """
                    />
                    <span class="help">
                    """ + self.msg["file_label"] + """
                    </span>
                </div>
                """,
                "html.parser",
            )

        def initialise_panel(self):
            return BeautifulSoup(
                f'<script>new ImportTextFieldPanel("{self.id_for_label()}")</script>',
                "html.parser",
)file_type_filteris added to theFieldPanelkwargs.- The
BoundPanelinitialistion checks for the presence of this filter and assigns it to theacceptsvariable. render_html()calls the inheritedBoundPanel.render_html()method, stores the result and passes this into aBeautifulSoupobject.- If no
textareaelement is found in the passed HTML, an error is raised using Django'sImproperlyConfiguredmethod, otherwise we add an additional CSS class to thetextareato allow some additional formatting. - The rendered panel's wrapper div element gets its
"data-field-wrapper"attribute value set to the value returned by the panel'sid_for_label method. import_text_field_button()appends the HTML for the fileinputelement to the wrapper element. There is also some basic help text to assist the editor. Thedivcontainer handles how to wrap these elements on narrow screen sizes (see CSS below).initialise_panel()appends to the wrapper ascriptelement to instantiate theImportTextFieldPanelJavaScript class using the panel'sid_for_labelvalue.- Finally, the
BeautifulSoupobject is converted to a string and returned to render the complete panel.
Adding custom CSS to the panel
We need to add come CSS to control the layout and behaviour of the panel.
Aside from some basic styling, we set:
- The file input and the file selector button to the same width (for reasons explained above).
- The file input container properties to display
flexand set theflex-wrapto handle positioning the elements on small screen sizes. - Set the text area
maxHeightand vertical scroll properties. - Note we need to use
!importanton those attributes that Wagtail's built-in CSS would normally have precedence over.
.textarea-fileinput {
    width: 10em !important;
    border: 0 !important;
    padding: 0 !important;
    margin-right: 1rem;
}
.textarea-fileinput::file-selector-button {
    width: 10em;
    padding: 0.3rem;
    border: 0;
    border-radius: 5px;
}
.textarea-fileinput-container {
    display: flex;
    flex-wrap: wrap;
    padding-top: 1em;
}
.import_text_area {
    max-height: 30em !important;
    overflow-y: auto !important;
    width: 100%;
}Important:
Depending on Wagtail version and/or any custom admin CSS you have in place, you may need to adjust this CSS to meet your needs.
Registering the custom JavaScript and CSS in the Admin interface
We'll make use of two hooks to do this: insert_global_admin_js and insert_global_admin_css
In wagtail_hooks.py:
from django.templatetags.static import static
from django.utils.safestring import mark_safe
from wagtail import hooks

@hooks.register('insert_global_admin_js')
def register_admin_js():
    import_text_field_panel_js = static('js/import_text_field_panel.js')
    return mark_safe(
        f'<script src="{import_text_field_panel_js}"></script>'
    )

@hooks.register('insert_global_admin_css')
def register_admin_css():
    import_text_field = static('css/import_text_field.css')
    return mark_safe(
        f'<link rel="stylesheet" href="{import_text_field}">'
    )
Using the ImportTextFieldPanel
Use this in any Page or Django model where you have a TextField.
In the content_panels declaration, use ImportTextFieldPanel in place of FieldPanel and, optionally, specify a file type filter.
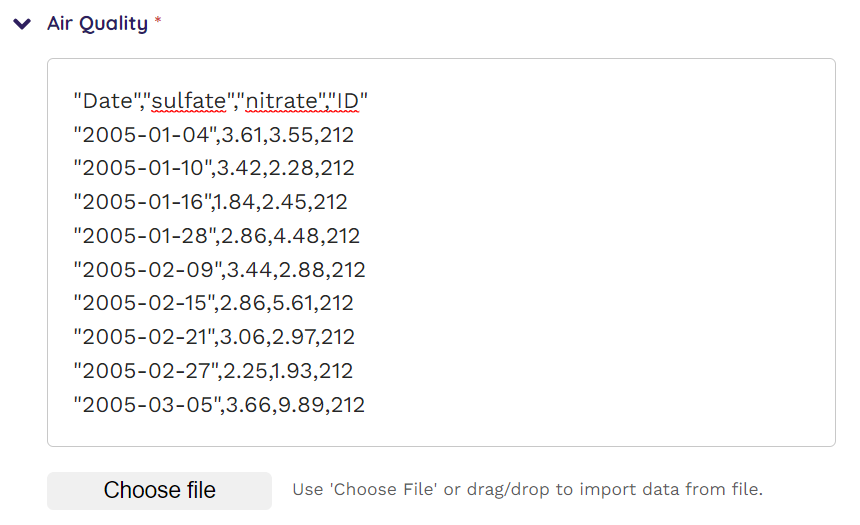
For example, if you had a Page model with an air_quality field used to store data from comma separated value files (.csv), you might use the following:
from wagtail.models import Page
from django.db import models

from core.panels import ImportTextFieldPanel

class SomePage(Page):
    air_quality = models.TextField(verbose_name="Air Quality")

    content_panels = Page.content_panels + [
        ImportTextFieldPanel('air_quality', file_type_filter=".csv"),
    ]
The rendered panel after a completed file reading operation would be similar to the following:
Conclusion
Importing text files into HTML form fields using the JavaScript FileReader object offers a powerful solution for incorporating external data seamlessly. Use of this technique facilitates efficient data transfer, enhances data input capabilities and improves user experience.
In this article, we covered the following points:
- How to import text from file on your web form without the need to upload files to your web server.
- Using the file type
<input>element, including customising its appearance and adding a file type filter with theacceptattribute. - Using the
changeevent on that element to perform custom behaviour by sending the chosen file to aFileReaderobject to read the file contents and pass the result to another element. - Adding drag/drop capability to a standard
<textarea>element by adding event listeners for thedragoveranddropevents and adding custom actions to thedropevent to read the file contents into thetextarea.
In addition, we covered creating a custom FieldPanel to use this technique in Wagtail's CMS including using hooks to register custom JavaScript and CSS.
In the next article, I'll cover how to use this technique in a reusable StructBlock for use in Wagtail's StreamField editor interface.