
Creating Wagtail Streamfield StructBlocks with a Customised Editor Interface
Introduction
One of the first things you'll learn on any Wagtail introduction course is how to create your own Streamfield StructBlocks as a compound block using built-in Wagtail block types. What happens when you have a need that goes beyond those built-in blocks such as dynamic front-end behaviour on the editing interface?
Wagtail allows you to create your own editing forms and add JavaScript for dynamic behaviour and active responses to editor actions. In this article we'll go through both using the methods using the example I gave in the previous discussion, augmenting a text area with the ability to read text files through either drag/drop or file input button. If you're needing an explanation of the file reading process, I recommend reading that article first.
Finally, I'll show how to use this as a building block for other compound StructBlocks.
The example below is intended as a demonstration of the technique to add JavaScript interaction with a StructBlock form rather than a solution to the case of adding file reading ability to a text area. A better solution for that case using a custom widget is given in the next article.
The first two minor releases of Wagtail 6.1 (<6.1.2) had a change so that only the first HTML node in a widget was rendered. If the widget had more than one top-level node, the subsequent nodes would be dropped from the render. This was fixed in 6.1.2, but it means the code on this page is not compatible with 6.1.0 or 6.1.1.
Customising the Wagtail StructBlock Form
Form Classname
To customize the styling of a StructBlock in the page editor, you can define a form_classname attribute. Specify it as a keyword argument in the StructBlock constructor or within a Meta subclass to override the default struct-block value.
class SomeBlock(blocks.StructBlock):
    some_var = blocks.CharBlock()
    other_var = blocks.CharBlock()

    class Meta:
        form_classname = 'struct-block some-block'
You can now add a CSS class definition for your custom class (some-block in the example above) to override any default styling for your block.
The struct-block class style is already included in Wagtail's editor styling. You must remember to specify the struct-block as well since if you supply a value for form_classname, it will override any classes that are already assigned to StructBlock.
Overriding the Form Template
You can modify the form_template attribute of the class Meta to give your own template path for more complex customizations that need modifications to the HTML markup as well.
class SomeBlock(blocks.StructBlock):
    some_var = blocks.CharBlock()
    other_var = blocks.CharBlock()

    class Meta:
        form_template = 'someapp/blocks/forms/some-block.html'
The template provides access to the following variables:
- children: An OrderedDict of BoundBlocks representing the child blocks within this StructBlock.
- help_text: The specified help text for this block.
- classname: The form_classname passed (defaults to 'struct-block').
- block_definition: The instance defining this StructBlock.
- prefix: The unique prefix used for form fields in this block instance.
The output of Wagtail's render_form template tag for each child block in the children dict must be included in the form template for a StructBlock within a container element with a data-contentpath attribute equal to the block's name. The commenting system makes use of this feature to associate comments with the appropriate fields. Labels for each field are also shown by the StructBlock's form template, although this and all other HTML can be changed as appropriate.
The template fragment below can be used to replicate Wagtail's StructBlock rendering as a base for your customisation:
{% load wagtailadmin_tags %}

<div class="{{ classname }}">
    {% if help_text %}
        <span>
            <div class="help">
                {% icon name="help" classname="default" %}
                {{ help_text }}
            </div>
        </span>
    {% endif %}

    {% for child in children.values %}
        <div class="w-field" data-field data-contentpath="{{ child.block.name }}">
            {% if child.block.label %}
                <label class="w-field__label" {% if child.id_for_label %}for="{{ child.id_for_label }}"{% endif %}>
                    {{ child.block.label }}{% if child.block.required %}<span class="w-required-mark">*</span>{% endif %}
                </label>
            {% endif %}
            {{ child.render_form }}
        </div>
    {% endfor %}
</div>
In the example later on, I'll go through customising this template to add a file input button and some extra HTML.
Additional Variables
You can add additional parameters to your StructBlock in your class initialisation and pass these and any other variables through to the template by overriding the get_form_context method.
class SomeBlock(StructBlock):
    def __init__(self, local_blocks=None, some_arg="", **kwargs):
        super().__init__(local_blocks, **kwargs)
        self.some_arg = some_arg

    some_var = blocks.CharBlock()
    other_var = blocks.CharBlock()

    class Meta:
        form_template = 'someapp/blocks/forms/some-block.html'

    def get_form_context(self, value, prefix="", errors=None):
        context = super().get_form_context(value, prefix, errors)
        context["some_arg"] = self.some_arg
        context["some_text"] = _(
            "Some translated text."
        )
        return context
We can access these in the template using the standard Django format (e.g. {{ some_arg }})
Adding JavaScript to StructBlock Forms
StreamField leverages the telepath library to establish a mapping between Python block classes like StructBlock and their corresponding JavaScript implementations.
Defining the StructBlockAdapter
To customize our own StructBlock, we must define a telepath StructBlockAdapter. This adapter allows us to replace the default StructBlockDefinition with our own JavaScript class.
The StructBlockAdapter requires the js_constructor attribute, which specifies the identifier for the JavaScript class (use the path to your StructBlock class), and a definition to include your custom JavaScript file in the form media attribute. You can also define additional CSS here.
Finally, the adapter and the corresponding StructBlock are registered in Telepath. You would normally do all of this in the same module as the StructBlock.
from django import forms
from django.utils.functional import cached_property
from wagtail.blocks import StructBlock, CharBlock
from wagtail.blocks.struct_block import StructBlockAdapter
from wagtail.telepath import register

class SomeBlock(StructBlock):
    ....

class SomeBlockAdapter(StructBlockAdapter):
    js_constructor = "someapp.blocks.SomeBlock"

    @cached_property
    def media(self):
        structblock_media = super().media
        return forms.Media(
            js=structblock_media._js + ["js/some-block.js"],
            css={"all": ("css/some-block.css",)},
        )

register(SomeBlockAdapter(), SomeBlock)
If you're not using any additional css, use css=structblock_media._css insteadAdding the Telepath JavaScript Class
Your JavaScript file must include a class that inherits StructBlockDefinition and registers that class against the identifier you defined for js_constructor above.
Normally, you will be taking the output of the default render method, assigning that to a variable, adding your custom JavaScript code, then returning that variable.
For example, the following JavaScript class converts any text entered into the some_var field and converts it to upper case. It's then registered against the name "someapp.blocks.SomeBlock" that we defined in the StructBlockAdapter example above:
// js/some-block.js

class ImportTextBlockDefinition extends window.wagtailStreamField.blocks
    .StructBlockDefinition {
    render(placeholder, prefix, initialState, initialError) {
        const block = super.render(
            placeholder,
            prefix,
            initialState,
            initialError,
        );

        const someVarField = document.getElementById(prefix + '-some_var');
        someVarField.addEventListener('input', (event) => {
            event.target.value = event.target.value.toUpperCase();
        });

        return block;
    }
}

window.telepath.register('blocks.models.ImportTextBlock', ImportTextBlockDefinition);
Note: to access thesome_varinput field for that field, we need to use(prefix + '-some_var')where prefix will be the UID for that block instance.
Example: Creating the ImportTextBlock
By utilizing the techniques described above, we can now create a custom StructBlock that incorporates a text area that provides the flexibility to import text through drag and drop functionality or a file input button.
Step 1. StructBlock and StructBlockAdapter Classes
Since this StructBlock is reusable, we only need to define the text field within the StructBlock class and include the corresponding form template.
To enhance the StructBlock's functionality, we introduce an optional parameter to specify a file type filter for the file input element. We pass this parameter as context to the template, along with translatable text to present to the editor.
Next, we proceed to define the StructBlockAdapter, assigning it a named identifier. Additionally, we include the necessary custom JavaScript and CSS files required for the editor form. Finally, we register this adapter with Telepath.
from django import forms
from django.utils.functional import cached_property
from django.utils.translation import gettext_lazy as _
from wagtail.blocks import StructBlock, TextBlock
from wagtail.blocks.struct_block import StructBlockAdapter
from wagtail.telepath import register

class ImportTextBlock(StructBlock):
    def __init__(self, local_blocks=None, file_type_filter="", **kwargs):
        super().__init__(local_blocks, **kwargs)
        self.accept = file_type_filter

    text = TextBlock()

    class Meta:
        form_template = "blocks/forms/import_text_block_form.html"

    def get_form_context(self, value, prefix="", errors=None):
        context = super().get_form_context(value, prefix, errors)
        context["instructions"] = _(
            "Use 'Choose File' or drag/drop to import data from file."
        )
        context["accept"] = self.accept
        return context

class ImportTextBlockAdapter(StructBlockAdapter):
    js_constructor = "blocks.models.ImportTextBlock"

    @cached_property
    def media(self):
        structblock_media = super().media
        return forms.Media(
            js=structblock_media._js + ["js/import-text-block.js"],
            css={"all": ("css/import-text-block.css",)},
        )

register(ImportTextBlockAdapter(), ImportTextBlock)
Step 2. Custom Form Template
Next, we take the template described previously and add some code to render a file input button with some instructions for the editor. We also include some custom CSS classes in that code that we'll use to style the render appropriately.
Since text is the only field defined in the StructBlock, it will only loop through the for loop once. The custom code is added immediately after the Wagtail render_form template tag has been called to keep the controls tight together. If you're creating a custom StructBlock with multiple fields, you'll need to handle this in the for loop.
{% load wagtailadmin_tags %}
<div class="{{ classname }} import-text-block">
    {% if help_text %}
        <span>
            <div class="help">
                {% icon name="help" classname="default" %}
                {{ help_text }}
            </div>
        </span>
    {% endif %}
    {% for child in children.values %}
        <div class="w-field" data-field data-contentpath="{{ child.block.name }}">
            {{ child.render_form }}
            {# -- Begin custom code for file input and instructions -- #}
            <div class="import-text-block-fileinput-container">
                <input type="file"
                       id="{{ prefix }}-fileinput"
                       class="import-text-block-fileinput"
                       {% if accept %}accept="{{ accept }}"{% endif %} />
                <span class="help">{{ instructions }}</span>
            </div>
            {# -- End custom code -- #}
        </div>
    {% endfor %}
</div>
Note the file input element gets the id "{{ prefix }}-fileinput". This will allow us to reference the correct element in the DOM in the custom JavaScript.Step 3. Custom CSS
We need a little CSS to style the custom HTML in the template, tweak the default and add a maximum height of 25em to the text area to prevent it growing too large after importing a large text file.
.import-text-block .w-field__wrapper {
    margin-bottom: 0.5rem;
}

.import-text-block textarea {
    max-height: 25em;
    overflow-y: auto !important;
}

.import-text-block .help {
    padding-top: 0.3rem;
}

.import-text-block-fileinput {
    width: 10em !important;
    border: 0 !important;
    padding: 0 !important;
    margin-right: 1rem;
}

.import-text-block-fileinput::file-selector-button {
    width: 10em;
    padding: 0.3rem;
    border: 0;
    border-radius: 5px;
}

.import-text-block-fileinput-container {
    display: flex;
    flex-wrap: wrap;
    margin: -1rem 0 1rem 0;
}
I'm setting the input element and the file selector button to the same width in order to hide selected file text that the input element would normally display. Because we set the input value to to empty after each file read operation, this will always display "No file selected" and would possibly be confusing for the editor.
Step 4. Custom Telepath JavaScript Class
All that's left is to to add the JavaScript to define the custom StructBlockDefinition class and register this with Telepath.
We sublass StructBlockDefinition, assign the returned value from the default render method to the variable block and add appropriate initialisation and event listener code before returning the block variable.
Finally, we register the class against the identifier 'blocks.models.ImportTextBlock' which we defined in our StructBlockAdapter previously.
The class includes code to handle drag/drop, file input and resize events. As mentioned earlier, the code to handle this was described in the previous article where you can read a full explanation.
class ImportTextBlockDefinition extends window.wagtailStreamField.blocks
    .StructBlockDefinition {
    render(placeholder, prefix, initialState, initialError) {
        const block = super.render(
            placeholder,
            prefix,
            initialState,
            initialError,
        );

        const fileInput = document.getElementById(prefix + '-fileinput');
        const textField = document.getElementById(prefix + '-text');
        const textInitialHeight = textField.style.height
        if (textField.style.maxHeight == '') { textField.style.maxHeight = '30em'; }
        textField.style.overflowY = 'auto';

        const readFile = (source, target) => {
            const reader = new FileReader();
            reader.addEventListener('load', (event) => {
                target.value = event.target.result;
                target.style.height = textInitialHeight;
                target.style.height = target.scrollHeight
                    + parseFloat(getComputedStyle(target).paddingTop)
                    + parseFloat(getComputedStyle(target).paddingBottom) + 'px';
            });
            reader.readAsText(source);
        }

        fileInput.addEventListener('change', (event) => {
            event.preventDefault();
            const input = fileInput.files[0];
            readFile(input, textField)
            fileInput.value = '';
            fileInput.blur();
        });

        textField.parentElement.addEventListener('dragover', (event) => {
            event.stopPropagation();
            event.preventDefault();
            event.dataTransfer.dropEffect = 'copy';
        });
        textField.parentElement.addEventListener('drop', (event) => {
            event.stopPropagation();
            event.preventDefault();
            const input = event.dataTransfer.files[0];
            readFile(input, textField)
        });

        return block;
    }
}

window.telepath.register('blocks.models.ImportTextBlock', ImportTextBlockDefinition);
Using the ImportTextBlock
The intended use for this particular StructBlock is as a component of other StructBlocks rather than being presented directly to the editor.
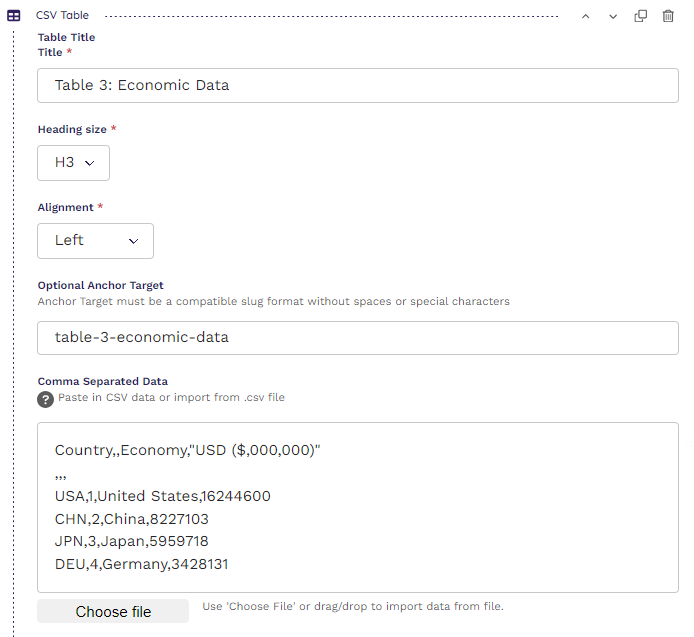
Below is partial code for a StructBlock that renders CSV data as an HTML table. The data variable is defined as an ImportTextBlock with file filter .csv to limit the file types offered if the editor selects the file input button.
class CSVTableBlock(StructBlock):
    title = HeadingBlock(required=False, label=_("Table Title"))
    data = ImportTextBlock(
        label=_("Comma Separated Data"),
        help_text=_("Paste in CSV data or import from .csv file"),
        file_type_filter='.csv'
    )
    precision = IntegerBlock(
        label=_("Float Precision"),
        default=2, help_text=_("Number of decimal places to display for float type.")
    )
    ....
The custom block is rendered inside the CSVTableBlock as follows:
To access the value of the ImportTextBlock, we need to drill down into the data variable to read the underlying text attribute of the ImportTextBlock.
In a template, that would look like:
{{ self.data.text }}While in a template tag, you would access it via variable['data']['text'], e.g.
{{ self|render_html_table }}@register.filter
def render_html_table(table_block):
df = pd.read_csv(
StringIO(table_block["data"]["text"]),
header=("infer" if table_block["column_headers"] else None),
)
....Further Reading
The following articles can be useful to research the concepts covered in the article in greater detail:
- How to build custom StreamField blocks - Wagtail documentation
- Form widget client-side API - Wagtail documentation
- Telepath Documentation - Covering the basics of the Telepath library including a useful tutorial project
Conclusion
This article has covered the process of creating custom Wagtail Streamfield StructBlocks with a customized editor interface. By customizing the Wagtail StructBlock form, you can enhance its functionality and styling.
We explored how to define a form_classname to customize the styling of a StructBlock and override the default form template by specifying a custom template path with form_template.
Additional variables can be added to the StructBlock and passed to the template using the get_form_context method.
Furthermore, we discussed the inclusion of JavaScript in StructBlock forms by utilizing the telepath library. This involved defining a StructBlockAdapter and associating it with a custom JavaScript class. The required JavaScript and CSS files were registered with Telepath for integration.
In the example provided, we created an Import Text Block that allows importing text through drag and drop or a file input button. We went through the step-by-step process of creating the StructBlock and StructBlockAdapter classes, custom form template, CSS styling, and JavaScript class.
Overall, this tutorial gives you an introduction into extending the capabilities of Wagtail StructBlocks and exploring more advanced data types. By leveraging these techniques, you can create dynamic and customized editing forms that meet your specific requirements.
Remember to adapt these concepts to suit your needs and explore the possibilities for further customization and integration within your Wagtail projects.